Sufey.org & More!
Hey! So Sufey, of http://www.Sufey.org, has asked that I guest-blog on her site, for which I was honored! Her blog is all about positivity, heart-warming posts, that often bring on a peaceful, tranquil feeling. She shares her travels, leading yoga class, everyday life in such a kind, friendly way. She has awesome recipes & poetic pictures to match it all. Her latest post, Raw Cheesecake, not only has a bomb cheesecake recipe, her little message before-hand is very thoughtful, illustrative, well-written.
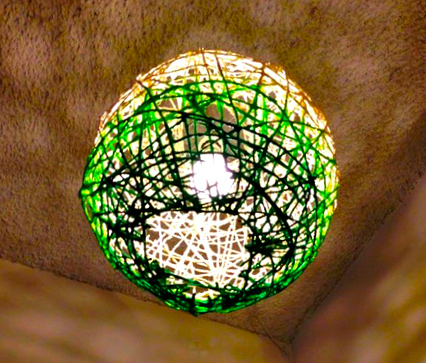
The following is finally, my finished, revamped, 2.0, diy twine pendant lamp, done right! 😉
This project can be super fun and easy (also a little messy), with a most gratifying outcome! There are a few examples of do-it-yourself twine-lamp-pendant projects out there if you were to google it. This post however, will hopefully offer a stripped-down, simplified fusion of all the DIY twine lamp posts I’ve researched, while being personable & maybe entertaining! ;D
materials:
Sooo, you’ll need twine! One can attain twine at your local hardware store. Any twine will do, from cotton, to jute, to sisal, and even hemp (found at any arts & crafts store). I chose sisal, for it’s “beige-iness” and slightly weathered, natural look. Jute is similar, except that it’s a darker shade. I think cotton & hemp can come in different colors though. Oh! And it’s like… $2-$4, depending on how big ‘a roll you buy. Honestly, you won’t need the $4 something roll… that’s a lot o’ twine.
You’ll also need a beach ball! … found at any party supply store… or probably Wal-Mart. It’s a dollar. And mine was 13″ in diameter.
You’ll need some hardware too. This could be a little tricky, but I just had an old paper lantern. You can buy one though, at an Urban Outfitters store, Ikea, party supply stores… or Wal-Mart. Anyways, the point is, I cut out & kept the metal ring at the top of the store-bought paper lantern, along with the metal cross bar piece, that you’d thread the light cord through. Paper lanterns should be around $5-$6. Also, pretty key, you’ll need a cord kit, also found at the aforementioned establishments. These’ll be about $10. I know, it’s starting to add up, but just think, boutiques/home furnishing stores sell these things for lots & lots more mula!
And now for the pièce de résistance… paper maché mixture, woohoo! All you’ll need is a medium size bowl, mix roughly one part flour (or one cup) to one part warm water (or cold water, whatevs’). If you have corn starch around, that helps too, I’d toss in a couple spoonfuls. If you happen to have some Elmer’s Glue, I’d empty the contents into the mixing bowl (regular size Elmer’s, that is). Aaand, mix, mix, mix, mix, mix! Now… some people say to add a little sprinkling of salt. I think it’s supposed to help, I dunno, preserve the “freshness” of the substance, once it has been applied. I did not add this, however. Now, you are ready to get messy…

what you’ll do!
You blow up the beach ball. Then, take the paper lantern metal ring that you cut out, trace that ring using a felt-pen, or Sharpie, on the top of the beach ball, then again at the opposite end. These circles will just be reference points for later.
Here again, some people would say to spray non-stick cooking oil, such as Pam, all over your beach ball. I’ve found that this just creates a slippery mess, however (even more-so than the slippery mess you’re going to have already). Anyway, what I did was, using some of the twine, tied the beach ball from the cabinet (or ceiling), above the kitchen sink, so that the ball was suspended, but at a comfortable level with which to wrap twine around. Make sure that piece of twine connecting the beach ball to the cabinet, or ceiling above, has the paper lantern metal ring, through it, but not yet resting on the beach ball. I’d take a yard or so of twine at a time, soak, soak, soak in paper machéness, & start a-wrappin’. Here’s what I surmise is the key though, once you’ve got a few strands running vertically on the ball, then I’d rest my paper lantern ring on top, then keep wrapping. When this baby gets dry, that ring will be sturdily embedded in the pendant lamp.
I tackled wrapping the beach ball in two sessions, only because for the latter, I wanted to flip the ball over & cover more of the bottom half of the ball. You should wait 24 hours, though, before doing something like this. That will give the paper maché time to harden. Upon flipping over, I just rested the ball on bowl & maneuvered the twine stategically. Okay then, wait another 24 hrs & your almost there!
Using the Sharpied circle along the bottom as your guide, take the marker again & copy that circle across the twine strands. Now you’ll have a circle drawn on the actual hardened twine. And now for the moment of truth! It’s time to let the air out of the beach ball, every so gingerly! Take some chopsticks, or something like the eraser end of a pencil, & gently prod the beach ball, helping it to deflate. Cut it if you have to, I say! Once deflated, you should have a round, twine shell!!! Now take some scissors, & cut just outside of the Sharpied circle you’ve made at the bottom of the hardened twine. Also, cut a circle out of the top, using the ensconced metal ring as your guideline. Now, ever-so-gently pull the deflated beach ball out of it’s cocoon!
That’s it, you’ve done it!!! You can do many optional steps, of course. I painted the bottom portion two tones, for that, “dipped in” painted look. I then bought some super-glossy lacquer spray to coat & protect the twine lamp (although, I gotta say, I didn’t see any difference). Whatever you do, don’t spray it with fire resistant fabric spray!!! I tried that the first time around & the twine lamp fell apart… literally… I used an LED, dimmable light bulb. Sure it’s more expensive (at around $8), but it should practically last a lifetime, & it stays cool to the touch, thus ensuring that the lamp not catch fire. Hang, & enjoy your most gnarly creation! I too, like the criss-crossing patterns it projects against the walls.
Finally, I did go to the Adams Avenue 2 Mile Art Walk. Basically, the shops were just opened later & there were a handful of singer/songwriters set up, playing their acoustic guitars. One main stage almost drowned-out another, smaller stage, with a girl playing acoustic guitar. I felt bad, a little. Artist Chris Dyer, http://www.PositiveCreations.CA had an extensive exhibition. His artwork is very vibrant, colorful, dare I say, psychedelic.
Thus concludes the… & More portion of this most groovy post. And also, thus concludes another stimulating jasoncarrdesign.com post. Thank you friends, for reading, & check out Sufey.org. 😉
